我的第一watercolorinstructor,一个非常好的艺术家,反对使用水彩开花。我认为是因为他的画是非常详细和controlledworks,他没有发现使用这些所谓的错误。他们做beginas错误当你第一次学画画,但我有discovereda方式让他们为我工作…特别是在花的作品。
在这个时间,试图迫使盛开在你的水彩画纸。首先,放下一个多彩的洗。任何颜色。然后把你刷在水、漩涡itaround如果你喜欢,然后,而不影响它在一个毛巾,接触纸你洗的是。你的绘画表面,而平,不要太倾斜。

你不需要揉约。你刚才做的是添加更多的水一部分洗,这水要迫使色素围成一个圈。将边缘粗糙,看起来有点像褶边。如果你不希望这看你的画,那你千万不要去回一个湿区和一个非常湿刷。明智的做法是,让一个洗到失去其光芒在添加另一个颜色。即便如此,你必须确保你刷是不要有太多的水。

另一种原因是将水彩花朵非常湿洗的颜色在你的绘画表面。倾斜表面略或更彻底。允许这个洗去干。注意,颜色已移到页面底部,当它没有别的地方可去,又开始上浮…。造成另一种类型的绽放。

这些类型的水彩开花,你通常不需要。因此,你应该吸收额外的湿颜料作为它收集底部的纸。下面的插图。
故意做这些,你将学习什么原因水彩开花。为了避免问题(如果你认为他们的问题),这样您可以采取一些措施来避免他们。当你浸在水里,然后你刷颜色,稍微吸干多余的水分在纸毛巾或海绵。污点在套圈结束这样的毛巾将吸收更多的水比色素。同样,如果你允许你的湿纸失去光泽,增加更多的颜色不会导致开花。

如果你的论文是倾斜的相当多,和你正在做的事情非常湿洗或釉料,你必须注意坑的底部,或洗底部的纸。你可以把很尖的毛巾摸,水坑和它将被吸收进毛巾。允许油漆所以被吸收的毛巾是更有效的比吸掉颜色。

 | 如果你上的压力你会提升整个颜色! |
使用水彩的花朵,让我们试着画一个大胡子虹膜。这些花的花瓣是稍微折边在底部,或者他们这种方式出现。所以当我使中风,形成花瓣,我允许颜色幻灯片底部和创建,无需劳动而不是出现在笔触。如果我没洗湿足够,我可以降一点水变成花瓣虽然它仍然是潮湿的,同样的事情也会发生。

工作在一小块of200 #沃特福德冷压水彩画纸,这是我第一次洗描绘顶部的花瓣虹膜。我很少画一朵花第一,因为我爱的自发性颜色当我躺下来。我不拘束的线,可以滴颜色随机的。
当然,没有错画第一,但你真的应该尝试一个松散的方法。它让你觉得在形状,和工作的刷来创建这些形状与简单的运动。我的板倾斜约20º允许颜料流动和水坑。我不能拍摄在直立状态,因为他们害怕这会滴下页面。
| 学画画没有图纸将在未来的通讯。它很容易应用于花,但更重要的是它可以用于建筑…甚至是人物画。 |
在颜色的花瓣有干燥后,我开始低花瓣洗允许前洗渗入到它。这关系这两个在一起看起来更新鲜。细节将在后面添加。我总是告诉我的学生,“细节是在de尾巴。”
当较低的花瓣是画,注意颜料和水堆积在底部的花瓣。是时候backwashes或水彩花朵将开始为你工作。色素(除非它滴下页面)将没有去哪里,作为水的蒸发,颜料似乎跑回这幅画。
而色素开始跑回了花瓣从底部,我工作在更强烈的颜色在上半部分。你可以开始看到watercolorblooms在这个插图。我也拿出一个小刷满水和德鲁它分解成蓝色的花瓣来创造更多的backwashes以线性形式。

当第一个虹膜是干的,我添加了一个第二个照片就把后面倾斜一点垂直,这样你可以看到细节。注意,在点的箭头,backwashes底部的花瓣和喉咙的深色虹膜。更多的细节被描绘的咽喉第一虹膜少了点水刷。其实我计划这“所谓”的错误,所以许多艺术家认为应该被避免。你是法官。

| 当画花和精致的主题,尝试从未使用重型色素当致力于水彩画纸。它开始看起来枯燥和馅饼。在工作上水彩油画,我使用了更多的不透明颜料与一些成功,它们看起来更像油画和丙烯画。较重的颜料在画布上水彩工作但我不把折边没有画他们。在纸上,我让水来帮助创建效果。我相信,水彩是唯一介质,不需要费力刷工作创建效果,如果你只是放弃一个小(或大)控制,让水做这个工作! |
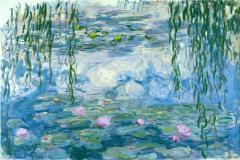
我们还可以使用水彩风景的花朵。先画你的情绪,你的天空,覆盖整个纸与这些洗。从来没有油漆到地平线,天空的颜色通常是反映在前景中的一切风景。有时你会有一个水体的景观,它是重要的画天空颜色为前景,因为水反映了天空。
油漆背景树木,黑暗或光明是否在颜色。允许色素失去其光芒。你可以看到光芒当了光。这是水,仍坐在表面的纸…或任何表面你画上。
在这幅画我把inpale黄色绿色的叶子,仿佛阳光是过滤通过树木。然后,当几乎干,我加载了一个圆尖刷,刷轻轻来回模拟叶子和四肢。

水推到一边的颜料,创建水彩花朵,我们一直在讨论。他们有羽毛的边缘和增加视觉作为叶子和闪耀。我甚至增加中风在小溪的水是叶子和岩石的顶部表面的水。

我也使用这种技术在山坡上左边来模拟树叶落在地面上。我将回到绘画深色色素对那些树木和树叶映衬下光。
看到细节的水彩开花

完成这幅画我添加了所有剪影的树干,用大量的釉彩的颜色,我黑暗的阴影和一些叶子。在这样做的时候,我画了很多的水彩画,但这是可以绽放,我们总是应该隐藏我们的技术只要有可能。有一幅画,只开花,不显示我们的能力来完成一幅画。这是完成的画:林地弹簧
它是有趣和轻松的方式来画这…没有真正的注意细节,除非我需要它之后。我总是说,将对你的水彩颜料你让它,这是一个例子!当你把水,只是让它“做自己的事”。等待,放弃控制,然后看看会发生什么。

原文如下:
My first watercolor instructor, a very fine artist, was opposed to using watercolor blooms. I assume that because his paintings are highly detailed and controlled works, that he found no use for these so-called mistakes. They do begin as mistakes when you are first learning to paint, but I have discovered a way to make them work for me…especially in flower paintings.
At this time, try to force a bloom on your watercolor paper. First, lay down a colorful wash. Any color. Then dip your brush in water, swirl it around if you like, and then, without blotting it on a towel, touch it to the paper where your wash is. Have your painting surface rather flat; not too tilted.
You need not rub it around. What you have just done is add more water to a portion of the wash, and this water will force the pigment into a circle. The edges will be rough, and look somewhat like ruffles. If you do not want this look in your painting, then you must not go back into a wet area with a very wet brush. It is advisable to allow a wash to lose its shine before adding another color. Even then, you must be sure that you brush is not loaded with too much water.
Another way to cause watercolor blooms is to put a very wet wash of color across your painting surface. Tilt the surface slightly or even more drastically. Allow this wash to dry. Notice that the color has drifted to the bottom of the page, and when it had nowhere else to go, it started floating upward again….thereby causing another type of bloom.
These are the kinds of watercolor blooms that you usually have no use for. Therefore, you should soak up the extra wet pigment as it collects at the bottom of the paper. Illustrations below.
By doing these intentionally, you will learn just what causes watercolor blooms. To avoid problems (if you think they’re problems) like these, there are steps you can take to avoid them. When you dip your brush in water and then color, slightly blot the excess water on a paper towel or sponge. Blot at the ferrule end so that the towel will absorb more water than pigment. Also, if you allow your wet paper to lose its shine, the addition of more color will not cause a bloom.
If your paper is tilted quite a bit, and you are doing very wet washes or glazes, you must be attentive to the puddle at the bottom of the wash, or at the bottom of the paper. You can take the very tip of a towel to touch that puddle and it will be absorbed into the towel. Allowing the paint so be soaked up in the towel is much more effective than blotting the color.
If you blot it with pressure you will lift the entire color!
To make use of the watercolor blooms, let’s try painting a bearded Iris. The petals of these flowers are slightly ruffled at the bottom, or they appear that way. So when I make the stroke that forms the petal, I allow the color to slide to the bottom and create that appearance without having to labor over doing it with brush strokes. If I haven’t made the wash wet enough, I can always drop a little water into the petal while it is still damp, and the same thing will happen.
Working on a small piece of 200# Waterford Cold Press watercolor paper, this is my first wash depicting the top petals of the Iris. I rarely draw a flower first, because I love the spontaneity of the color as I lay it down. I am not inhibited by the lines, and can drop color in at random.
Of course, there is nothing wrong with drawing it first, but you should really try a loose approach. It makes you think in shapes, and work the brush to create these shapes with simple movements. My board is tilted about 20º to allow the pigment to flow and puddle. I could not photograph it in the upright state for fear it would drip down the page.
Learning to paint without drawing will be in a future newsletter. It is easily applied to flowers, but more importantly it can be used in architecture…and even figure painting.
Before the color of the top petals dries, I begin the lower petal wash allowing the previous wash to bleed into it. This ties the two together with a fresher look. Detail will be added later. I have always told my students, “Detail comes at de-tail.”
When the lower petals are painted, notice the pigment and water pile up at the bottom of the petal. This is the time when backwashes or watercolor blooms will begin to work for you. The pigment (unless it drips off the page) will have no where to go, and as the water evaporates, the pigment seems to run back into the painting.
While the pigment is beginning to run back up into the petal from the bottom, I worked on the more intense color in the upper part. You can begin to see the watercolor blooms in this illustration. I also took a small brush filled with water and drew it down into the blue petals to create more backwashes in a linear form.
When the first Iris was dry, I added a second one behind it and tilted the photo just a bit more vertical so that you can see the detail. Notice, at the point of the arrows, the backwashes at the bottom of the petals and also in the throat of the darker Iris. More detail was painted into the throat of the first iris with a little less water on the brush. I actually planned this “so-called” mistake that so many artists think should be avoided. You be the judge.
When painting flowers and delicate subjects,try to never use heavy pigment when working on watercolor paper. It begins to look dull and pasty. In working on watercolor canvas, I have used more opaque pigments with some success, and they look more like oil or acrylic paintings.The heavier pigment work well on the watercolor canvas but I do not get the ruffled edges without painting them. On paper, I allow the water to help create the effect. It is my belief that watercolor is the only medium that does not require laborious brush work to create effects, if you just give up a little (or a lot of) control and let the water do the work!
We can also use watercolor blooms in a landscape. First paint in your mood, your sky, and cover the entire paper with these washes. Never paint just down to the horizon, as the color of the sky is usually reflected in everything in the foreground landscape. Sometimes you will have a body of water in the landscape, and it is important to paint the sky color into the foreground, since the water reflects the sky.
Paint background trees, whether dark or light in color. Allow the pigment to lose its shine. You can see the shine when held up to the light. That is the water that is still sitting on the surface of the paper… or whatever surface you are painting on.
In this painting I put in pale yellow green foliage, as if sunlight is filtering thru the trees. Then, when almost dry, I loaded the tip of a round brush, and brushed lightly back and forth to simulate leaves and limbs.
The water pushed aside the pigment, creating the watercolor blooms that we have been discussing. They have feathered edges and add to the visual as leaves and sparkle. I even added strokes in the stream of water to be leaves and rocks on top of the surface of the water.
I also used this technique in the hillside to the left to simulate leaves on the ground. I will go back into the painting with darker pigment for those trees and leaves that are silhouetted against the light.
See the details of the Watercolor Blooms
To finish the painting I added all the silhouetted tree trunks, and with a number of glazes of color, I darkened the shadows and some of the leaves. In doing so, I painted over many of the watercolor blooms, but this is OK, as we always should hide our technique whenever possible. To have a painting that is only blooms, doesn’t show our ability to finish a painting. Here is the finished painting: Woodland Spring
It is fun and relaxing to paint this way… No real attention to detail unless I need it later. I always said that watercolor will paint for you is you let it, and this is an example of just that! When you drop the water in, just let it “do its thing”. Wait, give up control, and watch what happens.